
Support on this page via E-Mail...
The drawing contents can at any time be enlarged, decreased, moved and rotated on screen. The drawing can be presented 2 and/or 3 dimensional. This depends on which type of drawing and which application. Still, they all have in common that the drawing contents are not touched, just the presentation on screen is changed. Only the presentation of the drawing or the model is displayed on screen.
Enlarge, decrease the screen picture can also be referred to as zooming.
Move contents on screen, but keep the same size can also be referred to as panning.
You can select the various options via menus and tool buttons, but in order to make this more efficient, all the functions can be reached via the middle mouse button. This also allows you to manipulate the screen picture when a command is active and expecting an answer from the user, either via a dialog box or by indicating a position.
By double-clicking on the middle mouse button, the screen contents will be repainted - making the drawing fill the screen in the best possible manner.
By pressing and letting go of the middle mouse button once, you will see the result of which zoom-operation that has been done previously. If this is executed after Display All on screen (Display All = double-click), the screen contents will be decreased with a factor of 2. This will also be repeated for each time you click once and let go of the button, until the image becomes so small that the contents again fills the whole screen.
When an object has been indicated on screen (blue, broken line), it can be zoomed in automatically - so that this object fills the screen in the best possible manner. Select this option by indicating the object and using the shortcut key: [Shift]+[Z]
By holding down the middle mouse button, the following symbol will be replaced by the cursor on screen.
Two options
The symbol displays two options divided by moving the cursor upwards or downwards on screen.

Move/pan
Keep holding down the mouse button while moving the cursor upwards. The "hand" is fixed to the drawing, and you can move both downwards, to the right/left and upwards - also beyond the visible screen area, as long as you hold down the middle mouse button. Let go of the mouse button when you have found the correct position.

Enlarge/zoom
Keep holding down the mouse button while moving the cursor downwards. The cursor is replaced by an arrow and a dynamic rectangle used to encircle the part of the drawing to be enlarged. This encircled part of the drawing is enlarged to adapt to the whole screen when you let go of the mouse button.
The presentation of the 3 dimensional contents of the drawing is activated by options in accordance with the active DDS-CAD. When the drawing is isometric, the options above can be used. The drawing can be further rotated on screen by clicking the left mouse button or the arrows belonging to the scrollbars.
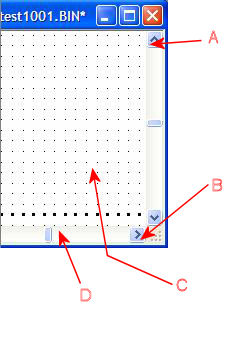
| A | By clicking on the left mouse button in the upper arrow button, the screen contents will be moved carefully and rotated positive around the X axis. |
| B | By clicking on the left mouse button in the lower arrow button, the screen contents will be moved carefully and rotated negative around the X axis |
| C | By clicking on the left mouse button in the left arrow button, the screen contents will be moved carefully and rotated positive around the Z axis |
| D | By clicking on the left mouse button in the right arrow button, the screen contents will be moved carefully and rotated negative around the Z axis |
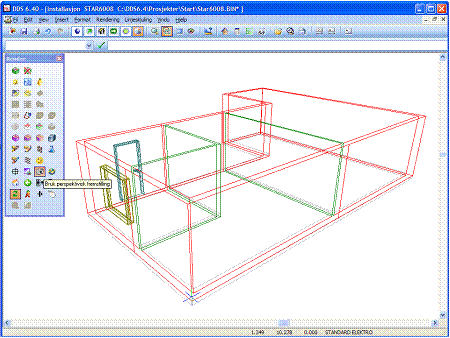
 Use perspective presentation of the screen contents – normally used on the 3D- and the room model. Be aware that you can also create a section of the drawing – for instance of a room. This can also be presented and handled perspective. The program rotates the image with the basis in default position of eye and focal point.
The general zoom options used via the middle mouse button cannot be used by perspective presentation.
To get closer or further away from the model, roll the middle mouse one way or the other.
Double-click on the middle mouse button to fill the screen in default perspective projection. The image can be moved by moving the button on the scrollbar at the bottom and to the right on screen.
If you hold down the middle mouse button, a symbol of two ellipses is displayed. Keep holding down the middle mouse button and rotate the image by moving the mouse.
Note: In perspective presentation the middle mouse button will not have the usual function. You can zoom in and out by rolling the wheel, but if you press down the wheel, you can only rotate the model you are looking at. To zoom in to an element, indicate it, click the right mouse button to get the pop-up menu, and select Zoom Object (Shift - Z)
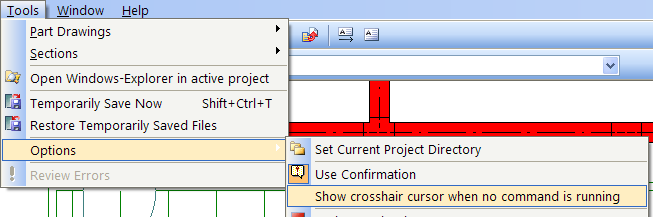
Tip: If you want to check the position of an element – for instance the height – you can do this if you have activated Snap, and also the function "Display cursor even if no command is active" (to be found in the pull-down menu: Tools -> Options-> Show crosshair cursor when no command is running)
Snap is activated, as the same time as cursor is displayed, even if no commands are active.
When these functions are active, you can see the contents in a 3D presentation, or in a section display, hold the cursor over the element of which you want to check the position. A yellow information box will display the element position.
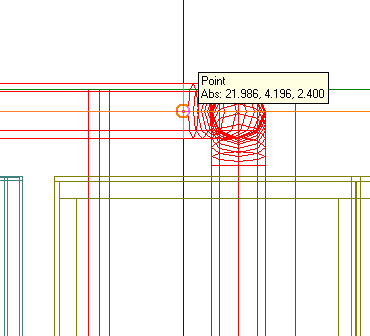
DDS-CAD has found a point on an element. The absolute co-ordinates are X=21.986, Y=4.196, while Z=2.4 metres.
If you want to check the height of a pipe or duct, you can do the same, or you can use the DDS-CAD SmartSnap function. When SmartSnap is active, and you select to activate SmartStart, a corresponding yellow information box will display which medium the duct or the pipe is, along with dimension and assembly height.
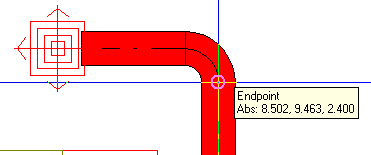
SmartSnap displays medium, dimension and position in the Z plan.
See video of SmartSnap and SmartStart. Not the position where the pipe runs from the shower cabinet and down under ground. There you will see the starting height for the pipe (Z=0 meter), and how deep the bend lies (Z=-0.35 meter) Further, you can see that this is a sewer pipe with a dimension of Ø 75 mm.
< Previous Chapter - Next Chapter >
